MARCOTTING AN AFRICAN TALISAY: Beginner’s Joy *
Do you know how to propagate an African Talisay tree?
The African Talisay is an elegant tree ideal for gardens or areas with wide growing space. It has a straight, slender trunk that can reach very tall heights with radial branches growing horizontally up to 6 feet or more in equidistant layers.
Compared to the local variety with oval leaves that are twice the size of the palm of your hand, its obovate leaves that are a little bigger than your thumb grow very close to each other in every stem, providing shade on hot, sunny days.
During the shedding off season, the leaves turn yellow and the branches may appear wilted after the leaves have fallen, but will nevertheless grow new leaves in a week’s time. It is best to plant it away from the roof or let it grow just below the roof as the fallen leaves may clog up the gutter if left un-swept. Daily sweeping of the ground may be needed as well during this period.
I bought a 5-foot tree for a pricey amount with a resolve to propagate it to recover my costs. After the tree became stable, I planted some cuttings which did not survive.
Following some marcotting tips I gathered from the internet, my first attempt was quite successful but took eight weeks for short roots to appear. Looking back, I probably missed out on something along the way or the environmental conditions and plant subject are different. Nevertheless, they are potential materials for my ongoing bonsai experiments.
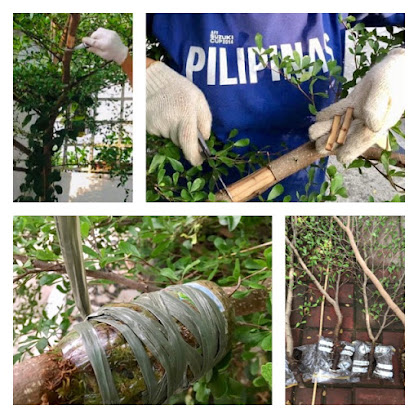
1. Identify a mature branch for marcotting. Choose the stem or branch you most probably would like to trim or cut, based on how you want the tree to grow. Unlike my first attempt where I used a horizontal growing branch, this time there is now an upward growing branch with horizontal stems available for my use and which I need to chop off to allow the tree to grow only as a single trunk.
2. Prepare the part of the branch for marcotting. Use the part right after a node. Create a slit about 3 inches long and remove the bark around it. Scrape off the cadmium layer to allow growth of roots.
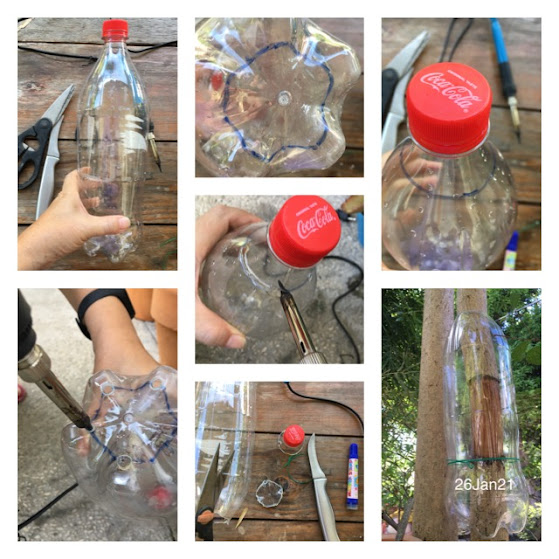
3. Prepare the growing container you will use. Instead of using a transparent plastic bag, I used an empty, colorless soda bottle. This allows the bottle to hold the soil in an upright position and for me to monitor the appearance of roots without opening the bottle.
a. Measure the circumference and growth position of the selected branch. This will guide you in determining whether to use a plastic bag, a plastic bottle or any commercial rooting box available.
b. Cut the top and bottom ends of the soda bottle 2 inches wider than the circumference of the branch. Cut one side of the bottle from top to bottom.
c. Open the bottle side ways and wrap it around the branch ensuring the two ends overlap each other and no gap is left open between the plastic and the branch at top and on the sides to prevent excess moisture from entering. Allow a slight gap for excess moisture to pass through at the bottom.
Note: After four weeks, I saw the soil already drying up so I watered it through the small window-like opening. After this, big roots started to be visible on the sixth week.
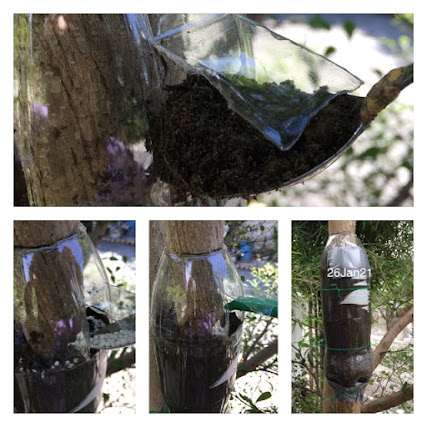
d. Secure the installed bottle with a garden wire around it to prevent it from opening; and with packing tape at top and bottom to prevent it from sliding with the weight of the soil.
e. Cut a small window opening on one side enough to allow pouring of germinating soil into it using a spoon.
f. Add fertilizer when bottle is almost full and cover with germinating soil. Pour water enough to drench the soil. Seal off the small window-like opening with packing tape.
g. Mark the bottle with date of marcotting and monitor progress of root development.
4. Cut the marcotted branch. When fully rooted, cut the marcotted branch right below the root ball, remove the plastic container and transfer to a new pot of suitable size. I will update this Blog with photos on later developments as this is a work in progress.
Update: Photos taken on 24 March 2021 after cutting of marcotted branch from the Mother tree:
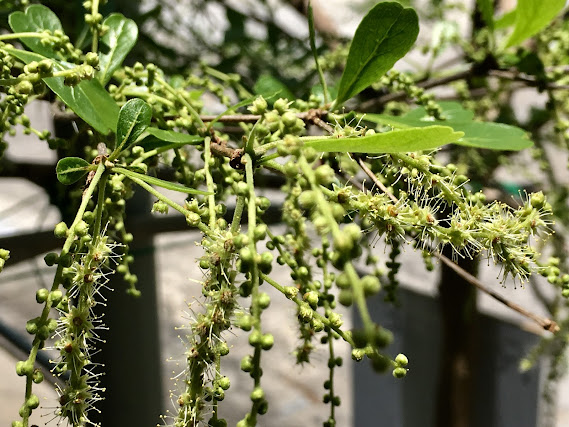
Update: Photos taken on 16 April 2021 showing new leaves and blooms coming out after it shed off original leaves during the first week after potting.
Update: Photos as of 20 April 2021:
Marcotting allows you to re-create the same plant without having to start from germinating a seed. It promotes faster plant growth, early blooming and shorter waiting time to harvest. The prices of plants have soared to sometimes unaffordable level during the pandemic period and marcotting is a cost-reducing method for propagating expensive plants. It can be a long-term food augmentation solution to address food shortages and possibly an alternative way of reviving deforested areas where a few endangered plant species still exist.
Watching the roots appear and grow day by day is such a pleasurable sight and a fulfilling experience. Soon this will be another beautiful tree with a new Plant Parent standing elegantly for plant lovers to view and enjoy.
Marcot and you shall reap.
You may email me at greencraftivist@gmail.com.
Keep safe and healthy,
Apple Bleza-Morales
* Published on the occasion of the 1st Death Anniversary of my Mother who instilled in me as a little child the value of gardening.
Update as of 31 May 2021: Marcotted tree now stands tall and gracefully in the garden of a new Plant Parent.
About the Author:
Photos by Maybelle B. Morales


Comments
Post a Comment